

Building a load-balanced production infrastructure in AWS
There are hundreds if not thousands of tutorials on how to set up a load-balanced infrastructure in AWS. This post is just my notes from when I set up a load-balanced infrastructure in AWS. Needless to say that the details of the real production app has been changed for confidentiality. So, you might see a silly application being load balanced. But the concepts are the same.
Note that this is not one of those ultra high scale applications. But it is a good starting point to build a scalable and production-ready infrastructure in AWS that could serve a few million users.
NOTE: The Cloud Formation Template and Code for this article is available in GitHub at embeddedinn/aws_production_lb
Requirements
- Application development has been in Docker containers in GitHub and we will be using the same for deployment.
- The app exposes services on two ports. One for the frontend and one for the backend.
- The application should be able to scale horizontally.
- Multiple availability zones should be supported. But to save cost, they will be brought up only when needed.
- VPCs and securoty groups should be setup to isolate the internal resources and expose them only to the load balancer.
- The load balancer is configured as a VPC link on the API Gateway that exposes the services to the public.
- A load balancer and API Gateway should be used to distribute the traffic.
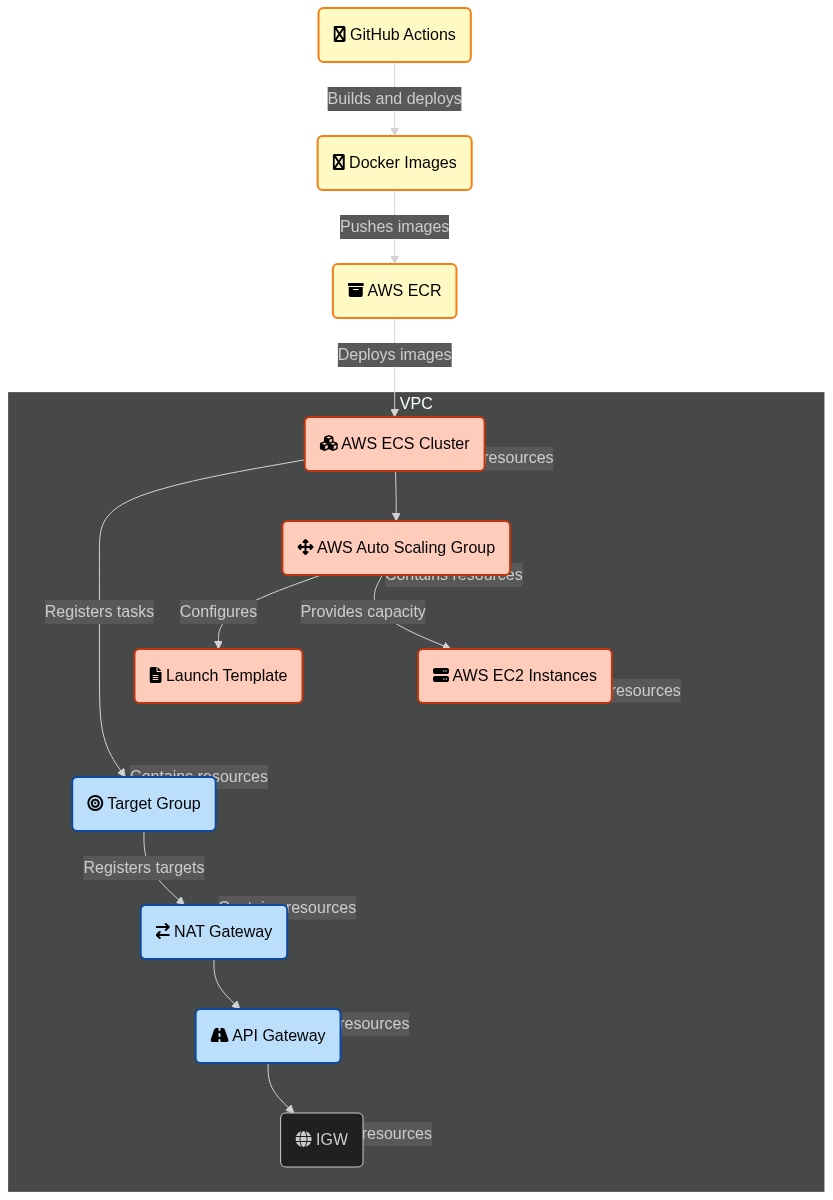
The complete setup as seen in AWS application composer would look like this:

AWS Application Composer view of the setup
Architecture
The Diagram below shows an approximation of the architecture that we will be setting up. Details will be discussed in the following sections.
Network Architecture Overview and Setup
This section provides a detailed explanation of the network architecture designed to securely and efficiently handle web traffic for an application deployed in AWS. The architecture leverages a VPC with public and private subnets, a NAT Gateway, and an internal NLB, with traffic routed through an API Gateway. This setup ensures that only the API Gateway is exposed to the internet, while all other resources remain securely isolated within the private subnet of the VPC.
Virtual Private Cloud (VPC)
The foundation of this architecture is a Virtual Private Cloud (VPC), that is logically isolated to deploy resources. The VPC is configured with a CIDR block of 10.0.0.0/16, providing a large address space (65,536 IP addresses) that can be further subdivided into smaller subnets. The VPC allows us to segment and secure the infrastructure by placing different components in either public or private subnets.
Subnets
- A public subnet (10.0.1.0/24) is a portion of the VPC’s address range that is exposed to the internet. Instances in this subnet can communicate directly with the outside world. The public subnet is also where the NAT Gateway and API Gateway are typically placed.
- A private subnet (10.0.2.0/24) is another segment within the VPC, but unlike the public subnet, it is isolated from direct internet access. Resources in the private subnet, such as the ECS tasks, EC2 instances, and the internal Load Balancer (NLB), do not have direct access to or from the internet. This enhances security by keeping your backend infrastructure hidden from the public internet.
Internet Gateway (IGW)
The Internet Gateway allows instances in the public subnet to communicate with the internet. It is attached to the VPC and enables outbound traffic from the public subnet to reach the internet. However, in this architecture, the Internet Gateway is used primarily for the NAT Gateway and the API Gateway, rather than directly exposing application resources.
NAT Gateway
The NAT Gateway is deployed in the public subnet to provide outbound internet access for resources in the private subnet. Instances in the private subnet cannot be accessed directly from the internet, but they can initiate outbound connections (e.g., to download software updates or access external APIs) through the NAT Gateway. This ensures that backend resources remain secure while still having access to necessary external services.
Route Tables
-
The
Public Route Tableis associated with the public subnet. It contains a route that directs all outbound traffic (0.0.0.0/0) to the Internet Gateway, allowing instances in the public subnet (like the NAT Gateway and API Gateway) to communicate with the internet. -
The
Private Route Tableis associated with the private subnet. It directs outbound traffic to the NAT Gateway, enabling instances in the private subnet to access the internet indirectly, without exposing them to inbound internet traffic. This ensures that sensitive components like the ECS tasks and the Load Balancer remain isolated.
Internal Network Load Balancer (NLB)
The NLB is placed in the private subnet and configured as an internal load balancer (Scheme: “internal”). This means it is not exposed to the internet and can only be accessed from within the VPC or through other AWS services like the API Gateway. The internal NLB distributes incoming traffic across multiple backend resources (e.g., ECS tasks, EC2 instances) running in the private subnet. By keeping the NLB internal, the architecture adds a layer of security, ensuring that only authorized traffic (routed through the API Gateway) can reach the backend services.
API Gateway
The API Gateway is the sole internet-facing component in this architecture. It is deployed in the public subnet and acts as a reverse proxy, handling all incoming HTTP requests from the internet. The API Gateway is configured to forward these requests to the internal NLB, which then routes the traffic to the appropriate backend services. This setup ensures that the backend services are not directly exposed to the internet, enhancing security and providing a single entry point for all external traffic.
Security Groups
-
The Load Balancer Security Group is configured to accept incoming traffic only from the API Gateway. This ensures that only requests routed through the API Gateway can reach the Load Balancer and, subsequently, the backend services.
-
The API Gateway Security Group allows traffic from any IP address (i.e., the public internet) but restricts outgoing traffic to the internal NLB. This ensures that only the API Gateway can forward traffic to the Load Balancer, maintaining a secure and controlled flow of data.
-
The EC2 Security Group allows incoming traffic from the Load Balancer Security Group, enabling communication between the Load Balancer and the EC2 instances. Outgoing traffic is allowed to any IP address, as the EC2 instances may need to access external resources.
-
The ECS Security Group is similar to the EC2 Security Group but is specifically designed for ECS tasks. It allows incoming traffic from the Load Balancer Security Group and outgoing traffic to any IP address.
Traffic Flow
- Inbound Traffic : External requests from clients on the internet are directed to the API Gateway, which serves as the front door for the application. The API Gateway processes and proxies these requests, forwarding them to the internal NLB within the private subnet.
- Load Balancing : The NLB receives the traffic from the API Gateway and distributes it across multiple instances or containers running in the private subnet. This ensures that the application can handle varying loads by automatically scaling the number of backend resources.
- Outbound Traffic : Instances in the private subnet can initiate outbound connections to the internet via the NAT Gateway. This allows backend services to access external resources (such as downloading updates) without exposing themselves to inbound internet traffic.
The CloudFormation template below can be used to set up the network described here. Once created , you can see it in the console like this:

Generated Netwpork in AWS Console
AWSTemplateFormatVersion: "2010-09-09"
Description: "CloudFormation template to set up VPC, Subnets, NAT Gateway, and Internal Load Balancer."

Resources:
  # VPC
  VPC:
    Type: "AWS::EC2::VPC"
    Properties:
      CidrBlock: "10.0.0.0/16"
      EnableDnsSupport: true
      EnableDnsHostnames: true
      Tags:
        - Key: "Name"
          Value: "appVPC"

  # Internet Gateway
  InternetGateway:
    Type: "AWS::EC2::InternetGateway"
    Properties:
      Tags:
        - Key: "Name"
          Value: "InternetGateway"

  # Attach Internet Gateway to VPC
  AttachGateway:
    Type: "AWS::EC2::VPCGatewayAttachment"
    Properties:
      VpcId: !Ref VPC
      InternetGatewayId: !Ref InternetGateway

  # Public Subnet
  PublicSubnet:
    Type: "AWS::EC2::Subnet"
    Properties:
      VpcId: !Ref VPC
      CidrBlock: "10.0.1.0/24"
      AvailabilityZone: !Select [0, !GetAZs ""]
      MapPublicIpOnLaunch: true
      Tags:
        - Key: "Name"
          Value: "PublicSubnet"

  # Private Subnet
  PrivateSubnet:
    Type: "AWS::EC2::Subnet"
    Properties:
      VpcId: !Ref VPC
      CidrBlock: "10.0.2.0/24"
      AvailabilityZone: !Select [0, !GetAZs ""]
      Tags:
        - Key: "Name"
          Value: "PrivateSubnet"

  # Route Table for Public Subnet
  PublicRouteTable:
    Type: "AWS::EC2::RouteTable"
    Properties:
      VpcId: !Ref VPC
      Tags:
        - Key: "Name"
          Value: "PublicRouteTable"

  # Route Table for Public Subnet
  PublicRoute:
    Type: "AWS::EC2::Route"
    Properties:
      RouteTableId: !Ref PublicRouteTable
      DestinationCidrBlock: "0.0.0.0/0"
      GatewayId: !Ref InternetGateway

  # Associate Public Subnet with Route Table
  PublicSubnetRouteTableAssociation:
    Type: "AWS::EC2::SubnetRouteTableAssociation"
    Properties:
      SubnetId: !Ref PublicSubnet
      RouteTableId: !Ref PublicRouteTable

  # NAT Gateway
  NatEIP:
    Type: "AWS::EC2::EIP"
    Properties:
      Domain: "vpc"

  # NAT Gateway
  NatGateway:
    Type: "AWS::EC2::NatGateway"
    Properties:
      AllocationId: !GetAtt NatEIP.AllocationId
      SubnetId: !Ref PublicSubnet
      Tags:
        - Key: "Name"
          Value: "natGateway"

  # Route Table for Private Subnet
  PrivateRouteTable:
    Type: "AWS::EC2::RouteTable"
    Properties:
      VpcId: !Ref VPC
      Tags:
        - Key: "Name"
          Value: "PrivateRouteTable"

  # Route Table for Private Subnet
  PrivateRoute:
    Type: "AWS::EC2::Route"
    Properties:
      RouteTableId: !Ref PrivateRouteTable
      DestinationCidrBlock: "0.0.0.0/0"
      NatGatewayId: !Ref NatGateway

  # Associate Private Subnet with Route Table
  PrivateSubnetRouteTableAssociation:
    Type: "AWS::EC2::SubnetRouteTableAssociation"
    Properties:
      SubnetId: !Ref PrivateSubnet
      RouteTableId: !Ref PrivateRouteTable

  # Internal Load Balancer (Private)
  LoadBalancer:
    Type: "AWS::ElasticLoadBalancingV2::LoadBalancer"
    Properties:
      Name: "internalLoadBalancer"
      Subnets:
        - !Ref PrivateSubnet
      Scheme: "internal"
      LoadBalancerAttributes:
        - Key: "deletion_protection.enabled"
          Value: "false"
      SecurityGroups:
        - !Ref LoadBalancerSecurityGroup
      Type: "network"
      IpAddressType: "ipv4"
      EnforceSecurityGroupInboundRulesOnPrivateLinkTraffic: "off"
      Tags:
        - Key: "Name"
          Value: "internalLoadBalancer"

  # Security Group for Load Balancer
  LoadBalancerSecurityGroup:
    Type: "AWS::EC2::SecurityGroup"
    Properties:
      GroupDescription: "Allow inbound traffic to Load Balancer"
      VpcId: !Ref VPC
      SecurityGroupIngress:
        - IpProtocol: tcp
          FromPort: 80
          ToPort: 80
          SourceSecurityGroupId: !GetAtt ApiGatewaySecurityGroup.GroupId
        - IpProtocol: tcp
          FromPort: 8000
          ToPort: 8000
          SourceSecurityGroupId: !GetAtt ApiGatewaySecurityGroup.GroupId
      SecurityGroupEgress:
        - IpProtocol: "-1"
          CidrIp: "0.0.0.0/0"
      Tags:
        - Key: "Name"
          Value: "LoadBalancerSecurityGroup"

  # Security Group for API Gateway
  ApiGatewaySecurityGroup:
    Type: "AWS::EC2::SecurityGroup"
    Properties:
      GroupDescription: "Allow traffic from API Gateway to Load Balancer"
      VpcId: !Ref VPC
      SecurityGroupIngress:
        - IpProtocol: tcp
          FromPort: 80
          ToPort: 80
          CidrIp: "0.0.0.0/0"
        - IpProtocol: tcp
          FromPort: 8000
          ToPort: 8000
          CidrIp: "0.0.0.0/0"
      SecurityGroupEgress:
        - IpProtocol: "-1"
          CidrIp: "0.0.0.0/0"
      Tags:
        - Key: "Name"
          Value: "ApiGatewaySecurityGroup"

  # Security Group for ECS Tasks
  ECSSecurityGroup:
    Type: "AWS::EC2::SecurityGroup"
    Properties:
      GroupDescription: "Allow traffic from Load Balancer to ECS Tasks"
      VpcId: !Ref VPC
      SecurityGroupIngress:
        - IpProtocol: tcp
          FromPort: 80
          ToPort: 80
          SourceSecurityGroupId: !GetAtt LoadBalancerSecurityGroup.GroupId
        - IpProtocol: tcp
          FromPort: 8000
          ToPort: 8000
          SourceSecurityGroupId: !GetAtt LoadBalancerSecurityGroup.GroupId
      SecurityGroupEgress:
        - IpProtocol: "-1"
          CidrIp: "0.0.0.0/0"
      Tags:
        - Key: "Name"
          Value: "ECSSecurityGroup"

  # Security Group for EC2 Instances
  EC2SecurityGroup:
    Type: "AWS::EC2::SecurityGroup"
    Properties:
      GroupDescription: "Allow traffic from Load Balancer to EC2 Instances"
      VpcId: !Ref VPC
      SecurityGroupIngress:
        - IpProtocol: tcp
          FromPort: 80
          ToPort: 80
          SourceSecurityGroupId: !GetAtt LoadBalancerSecurityGroup.GroupId
        - IpProtocol: tcp
          FromPort: 8000
          ToPort: 8000
          SourceSecurityGroupId: !GetAtt LoadBalancerSecurityGroup.GroupId
      SecurityGroupEgress:
        - IpProtocol: "-1"
          CidrIp: "0.0.0.0/0"
      Tags:
        - Key: "Name"
          Value: "EC2SecurityGroup"
Application Deployment - Local Setup
Now that we have setup the network, we can deploy the application. But before that , we must be able to test it locally.
The application is a simple web app that consists of a HTML frontend and a python backend. The frontend is a simple HTML page that calls a backend API to show the API status. The application is containerized using Docker. The frontend will be served on port 80, and the backend will be served on port 8000.
This is a trivial application that we will use to demonstrate the setup of a multi-component production infrastructure. The actual application will be more complex and will have additional services and components.
Frontend
The index.html file contains the following content:
<!DOCTYPE html>
<html lang="en">
<head>
    <meta charset="UTF-8">
    <meta http-equiv="X-UA-Compatible" content="IE=edge">
    <meta name="viewport" content="width=device-width, initial-scale=1.0">
    <title>Frontend</title>
</head>

<body>
    <h1>Frontend</h1>
    <p id="data"></p>

    <script>
        // Set the API host to wherever the page is loaded from
        const api_host = `${window.location.origin}:8000/status`;

        fetch(api_host)
            .then(response => response.json())
            .then(data => {
                document.getElementById('data').innerText = "API STATUS: " + data.STATUS;
            })
            .catch(error => {
                console.error('Error:', error);
            });
    </script>
</body>
</html>
Note: We will later change the backend URL to the API gateway resource URL during deployment.
Backend
The backend exposes a simple FastAPI based API endpoint that is used by the frontend. The file structure of the backend service that we will setup in docker is as follows:
.
├── app
│   ├── __init__.py
│   └── main.py
└── static
    └── index.html
└── requirements.txt
__init.py is blank, and main.py contains the FastAPI code:
#main.py
from typing import Union
from fastapi import FastAPI
from fastapi.middleware.cors import CORSMiddleware
from fastapi.staticfiles import StaticFiles
import threading
import uvicorn

backend = FastAPI()
frontend = FastAPI()

# CORS settings for the backend
backend.add_middleware(
    CORSMiddleware,
    allow_origins=["*"],  # Allow all origins
    allow_credentials=True,
    allow_methods=["GET"],  # Allow only GET methods
    allow_headers=["*"],  # Allow all headers
)

@backend.get("/status")
def read_status():
    return {"STATUS": "UP"}

@backend.get("/items/{item_id}")
def read_item(item_id: int, q: Union[str, None] = None):
    return {"item_id": item_id, "q": q}

frontend.mount("/", StaticFiles(directory="static", html=True), name="static")

def run_backend():
    uvicorn.run(backend, host="0.0.0.0", port=8000)

def run_frontend():
    uvicorn.run(frontend, host="0.0.0.0", port=80)

if __name__ == "__main__":
    backend_thread = threading.Thread(target=run_backend)
    frontend_thread = threading.Thread(target=run_frontend)

    backend_thread.start()
    frontend_thread.start()

    backend_thread.join()
    frontend_thread.join()
The requirements.txt file contains the following dependencies:
fastapi[standard]>=0.112.2
pydantic>=2.8.2
uvicorn>=0.30.6
The backend app can be run locally using the following commands:
python3 app/main.py
Docker Setup
Now that we have the frontend and backend components, we can create a docker image for them. We will wrap both the frontend and backend in a single Dockerfile. The Dockerfile is as follows:
FROM python:3.12-slim
WORKDIR /code
COPY ./requirements.txt /code/requirements.txt
RUN pip install --no-cache-dir --upgrade -r /code/requirements.txt
COPY ./app /code/app
COPY ./index.html /code/static/index.html
CMD ["python3", "app/main.py"]
EXPOSE 80
EXPOSE 8000
the docker container can be built and run using the following commands:
docker build . -t app
docker run -p 80:80 -p 8000:8000 app:latest
AWS Deployment
Now that we have a working version of the application, we can deploy it to AWS. We will use AWS ECS to deploy the application in a scalable and fault-tolerant manner. The application will be deployed as a service in an ECS cluster. The docker image will be built and pushed to AWS ECR, and the ECS service will be configured to use this image.
Add the following statements to the cloudformation template to setup a private ECR repo to host the docker images.
  # ECR Repository
  ECRRepository:
    Type: "AWS::ECR::Repository"
    Properties:
      RepositoryName: "app_repository"
      ImageScanningConfiguration:
        ScanOnPush: true
      Tags:
        - Key: "Name"
          Value: "appRepository"
Update the stack with the following command:
aws cloudformation update-stack --stack-name App-Stack --template-body file://temlpate.yml --profile embeddedinn
To push the image to the repository manually, navigate to ECR from the console and follow the steps under “View push commands”.
In later sections, we will setup a GitHub action to version control the application files and automate this process.
Capacity Provisioning
The next step is to provision the capacity for the ECS cluster. We will use an Auto Scaling Group to manage the EC2 instances that will run the ECS tasks. The Auto Scaling Group will be configured to launch instances in the private subnet of the VPC, ensuring that the backend services are isolated from the public internet.
The launch template will pull in Amazon Linux image optimized for ECS. This image runs the ECS agent and is pre-configured to work with ECS. The launch template will also specify the instance type, key pair, and security group for the EC2 instances. The template also defines the availability zone and subnet for the instances.
Using the launch template, we will define the Auto Scaling Group. We will set the max capacity to 10 instances, with a desired capacity of 0. This will ensure that no instances are running initially, and the Auto Scaling Group will scale up based on the demand from ECS tasks.
The autoscaling group will be then wrapped into a capacity provider. The capacity provider will be used by the ECS service to manage the capacity of the ECS cluster.
We will omit attaching a key pair to the instances as we will be using the ECS service to manage the instances.
The following CloudFormation template can be used to setup these items:
  # IAM Role for ECS Instance
  ECSInstanceRole:
    Type: "AWS::IAM::Role"
    Properties:
      RoleName: "ecsInstanceRole"
      AssumeRolePolicyDocument:
        Version: "2012-10-17"
        Statement:
          - Effect: "Allow"
            Principal:
              Service:
                - "ec2.amazonaws.com"
            Action:
              - "sts:AssumeRole"
      ManagedPolicyArns:
        - "arn:aws:iam::aws:policy/service-role/AmazonEC2ContainerServiceforEC2Role"
        - "arn:aws:iam::aws:policy/service-role/AmazonECSTaskExecutionRolePolicy"
        - "arn:aws:iam::aws:policy/CloudWatchLogsFullAccess"

  # IAM Instance Profile for ECS Instance
  ECSInstanceProfile:
    Type: "AWS::IAM::InstanceProfile"
    Properties:
      InstanceProfileName: "ecsInstanceProfile"
      Roles:
        - !Ref ECSInstanceRole

  # Launch Template for ECS Instance
  ECSLaunchTemplate:
    Type: "AWS::EC2::LaunchTemplate"
    Properties:
      LaunchTemplateName: "ecsLaunchTemplate"
      LaunchTemplateData:
        ImageId: "ami-09f63ae8e9b15e9b2"
        InstanceType: "t2.micro"
        Monitoring:
          Enabled: true
        TagSpecifications:
          - ResourceType: "instance"
            Tags:
              - Key: "Name"
                Value: "appInstance"
        NetworkInterfaces:
          - AssociatePublicIpAddress: false
            DeleteOnTermination: true
            DeviceIndex: 0
            Groups:
              - !GetAtt EC2SecurityGroup.GroupId
        IamInstanceProfile:
          Arn: !GetAtt ECSInstanceProfile.Arn
        UserData: !Base64 |
          #!/bin/bash
          echo ECS_CLUSTER=appCluster >> /etc/ecs/ecs.config

  # ECS Auto Scaling Group
  ECSAutoScalingGroup:
    Type: "AWS::AutoScaling::AutoScalingGroup"
    Properties:
      AutoScalingGroupName: "ecsAutoScalingGroup"
      LaunchTemplate:
        LaunchTemplateId: !Ref ECSLaunchTemplate
        Version: !GetAtt ECSLaunchTemplate.LatestVersionNumber
      MinSize: 0
      MaxSize: 10
      HealthCheckType: "EC2"
      AvailabilityZones:
        - !Select [0, !GetAZs ""]
      TerminationPolicies:
        - Default
      HealthCheckGracePeriod: 0
      DesiredCapacity: 0
      VPCZoneIdentifier:
        - !Ref PrivateSubnet
      Tags:
        - Key: "Name"
          Value: "ecsAutoScalingGroup"
          PropagateAtLaunch: true
      ServiceLinkedRoleARN: !Sub "arn:aws:iam::${AWS::AccountId}:role/aws-service-role/autoscaling.amazonaws.com/AWSServiceRoleForAutoScaling"

  # ECS Capacity Provider
  ECSCapacityProvider:
    Type: "AWS::ECS::CapacityProvider"
    Properties:
      Name: "appECSCapacityProvider"
      AutoScalingGroupProvider:
        AutoScalingGroupArn: !Ref ECSAutoScalingGroup
        ManagedScaling:
          Status: "ENABLED"
          TargetCapacity: 100
          MinimumScalingStepSize: 1
          MaximumScalingStepSize: 10
          InstanceWarmupPeriod: 300
        ManagedTerminationProtection: "DISABLED"
        ManagedDraining: ENABLED
Note : Notice the userdata section in the launch template. This is used to configure the ECS agent on the instances. We are hardcoding the cluster name here. This is an item that could be parameterized.
Loadbalancer Target Group and listner Setup
A target group in the load balancer is used to route traffic to the backend services. The target group is associated with the ECS tasks that are running the backend services. The target group is configured to use the internal NLB as the load balancer, ensuring that traffic is routed to the backend services running in the private subnet. When ECS clusters scale up or down, the target group will automatically register or deregister the ECS tasks based on the demand.
We will setup two target groups, one for the frontend and one for the backend. The frontend target group will be associated with the frontend service running on port 80, and the backend target group will be associated with the backend service running on port 8000. These target groups will be also added to the load balancer as listeners.
  # Target Groups for Load Balancer
  FrontendTargetGroup:
    Type: "AWS::ElasticLoadBalancingV2::TargetGroup"
    Properties:
      Name: "frontendTargetGroup"
      Port: 80
      Protocol: "TCP"
      VpcId: !Ref VPC
      TargetType: "instance"
      HealthCheckEnabled: true
      HealthCheckIntervalSeconds: 30
      HealthCheckPath: "/"
      HealthCheckPort: "80"
      HealthCheckProtocol: "HTTP"
      HealthCheckTimeoutSeconds: 5
      HealthyThresholdCount: 2
      UnhealthyThresholdCount: 2

  # Target Groups for Load Balancer
  BackendTargetGroup:
    Type: "AWS::ElasticLoadBalancingV2::TargetGroup"
    Properties:
      Name: "backendTargetGroup"
      Port: 8000
      Protocol: "TCP"
      VpcId: !Ref VPC
      TargetType: "instance"
      HealthCheckEnabled: true
      HealthCheckIntervalSeconds: 30
      HealthCheckPath: "/status"
      HealthCheckPort: "8000"
      HealthCheckProtocol: "HTTP"
      HealthCheckTimeoutSeconds: 5
      HealthyThresholdCount: 2
      UnhealthyThresholdCount: 2

  # Listeners for Load Balancer
  FrontendListener:
    Type: "AWS::ElasticLoadBalancingV2::Listener"
    Properties:
      DefaultActions:
        - TargetGroupArn: !Ref FrontendTargetGroup
          Type: "forward"
      LoadBalancerArn: !Ref LoadBalancer
      Port: 80
      Protocol: "TCP"

  # Listeners for Load Balancer
  BackendListener:
    Type: "AWS::ElasticLoadBalancingV2::Listener"
    Properties:
      DefaultActions:
        - TargetGroupArn: !Ref BackendTargetGroup
          Type: "forward"
      LoadBalancerArn: !Ref LoadBalancer
      Port: 8000
      Protocol: "TCP"
ECS Cluster Setup
Now that we have a cluster capacity provider, we can define the tasks, services, and cluster for the ECS setup. A task definition defines the container image and port mappings for the ECS task and uses the default cluster capacity provider. The task definition will be used by the ECS service to run the containers in the ECS cluster.
The ECS service will be configured to use the capacity provider we defined earlier. This will ensure that the service can scale up and down based on the demand from the ECS tasks.
The ECS cluster will be created with the capacity provider and the service. The cluster will be associated with the VPC and the private subnet. The service tasks will register with the NLB listeners.
Note that the cluster name here should match the userdata in the launch template in order for the ECS agent to register the instances with the cluster.
  # Create a cluster to run the ECS tasks
  ECSCluster:
    Type: "AWS::ECS::Cluster"
    Properties:
      ClusterName: "appCluster"
      CapacityProviders:
        - !Ref ECSCapacityProvider
      DefaultCapacityProviderStrategy:
        - CapacityProvider: !Ref ECSCapacityProvider
          Weight: 1
          Base: 1

  #EC2 ECS task definition
  ECSTaskDefinition:
    Type: "AWS::ECS::TaskDefinition"
    Properties:
      RequiresCompatibilities:
        - "EC2"
      ContainerDefinitions:
        - Name: "appContainer"
          Image: !GetAtt ECRRepository.RepositoryUri
          PortMappings:
            - ContainerPort: 8000
              HostPort: 8000
              Protocol: "tcp"
            - ContainerPort: 80
              HostPort: 80
              Protocol: "tcp"
          Essential: true
          Memory: 512
      Family: "appTaskDefinition"

  # ECS Service
  ECSService:
    Type: "AWS::ECS::Service"
    Properties:
      Cluster: !Ref ECSCluster
      ServiceName: "appService"
      TaskDefinition: !Ref ECSTaskDefinition
      DesiredCount: 2
      DeploymentConfiguration:
        MaximumPercent: 100
        MinimumHealthyPercent: 50
      LoadBalancers:
        - ContainerName: "appContainer"
          ContainerPort: 8000
          TargetGroupArn: !Ref BackendTargetGroup
        - ContainerName: "appContainer"
          ContainerPort: 80
          TargetGroupArn: !Ref FrontendTargetGroup
      SchedulingStrategy: "REPLICA"
      DeploymentController:
        Type: "ECS"
      CapacityProviderStrategy:
        - CapacityProvider: !Ref ECSCapacityProvider
          Weight: 1
      Tags:
        - Key: "Name"
          Value: "appService"
        - Key: "LoadBalancer"
          Value: !Ref LoadBalancer
The tags includes a reference to the load balancer to ensure that the cloudfomration stack waits for the load balancer to be created before creating the service.
At the end of this process, we can see the load balancer in the console like this:

Load Balancer in AWS Console
Two tasks have been brought up in two different EC2 instances that we configured using the template. The target group performs health checks on the tasks and routes traffic to them based on the health checks.
API Gateway Setup
All the resources we setup so fas are internal to the VPC. To expose the services to the public, we will use the API Gateway. The API Gateway will be configured to use the internal NLB as a VPC link. This private integration will allow the API Gateway to route traffic to the internal services running in the private subnet of the VPC. Requests coming into the API Gateway will be proxied to the internal NLB, which will then route the traffic to the backend services.
To setup teh API gateway and routes, add the following to the cloudformation template:
  # VPC link for REST API and attaching NLB to VPC
  VpcLink:
    Type: "AWS::ApiGateway::VpcLink"
    Properties:
      Name: "appVpcLink"
      Description: "VPC Link for app"
      TargetArns:
        - !Ref LoadBalancer

  # API Gateway
  APIGateway:
    Type: "AWS::ApiGateway::RestApi"
    Properties:
      Name: "appAPI"
      Description: "app API"
      FailOnWarnings: "true"
      EndpointConfiguration:
        Types:
          - "REGIONAL"
      Tags:
        - Key: "Name"
          Value: "appAPI"

  # API Gateway Frontend Resources
  APIGatewayResourceFronetnd:
    Type: "AWS::ApiGateway::Resource"
    Properties:
      RestApiId: !Ref APIGateway
      ParentId: !GetAtt APIGateway.RootResourceId
      PathPart: "frontend"

  # API Gateway Backend Resources
  APIGatewayResourceBackend:
    Type: "AWS::ApiGateway::Resource"
    Properties:
      RestApiId: !Ref APIGateway
      ParentId: !GetAtt APIGateway.RootResourceId
      PathPart: "backend"

  # API Gateway Proxy Resources
  APIGatewayResourceBackendProxy:
    Type: "AWS::ApiGateway::Resource"
    Properties:
      RestApiId: !Ref APIGateway
      ParentId: !Ref APIGatewayResourceBackend
      PathPart: "{proxy+}"

  #Root get method to load the frontend page
  APIGatewayMethodRoot:
    Type: "AWS::ApiGateway::Method"
    Properties:
      RestApiId: !Ref APIGateway
      ResourceId: !GetAtt APIGateway.RootResourceId
      HttpMethod: "GET"
      AuthorizationType: "NONE"
      Integration:
        ConnectionType: "VPC_LINK"
        ConnectionId: !Ref VpcLink
        Type: "HTTP_PROXY"
        IntegrationHttpMethod: "GET"
        Uri: !Sub "http://${LoadBalancer.DNSName}:80"
        IntegrationResponses:
          - StatusCode: 200
      MethodResponses:
        - StatusCode: 200

  # API Gateway Method for Frontend
  APIGatewayMethodFrontend:
    Type: "AWS::ApiGateway::Method"
    Properties:
      RestApiId: !Ref APIGateway
      ResourceId: !Ref APIGatewayResourceFronetnd
      HttpMethod: "GET"
      AuthorizationType: "NONE"
      Integration:
        ConnectionType: "VPC_LINK"
        ConnectionId: !Ref VpcLink
        Type: "HTTP_PROXY"
        IntegrationHttpMethod: "GET"
        Uri: !Sub "http://${LoadBalancer.DNSName}:80"
        IntegrationResponses:
          - StatusCode: 200
      MethodResponses:
        - StatusCode: 200

  # API Gateway Method for Backend
  APIGatewayMethodBackend:
    Type: "AWS::ApiGateway::Method"
    Properties:
      RestApiId: !Ref APIGateway
      ResourceId: !Ref APIGatewayResourceBackendProxy
      HttpMethod: "GET"
      AuthorizationType: "NONE"
      RequestParameters:
        method.request.path.proxy: true
      Integration:
        ConnectionType: "VPC_LINK"
        ConnectionId: !Ref VpcLink
        Type: "HTTP_PROXY"
        IntegrationHttpMethod: "GET"
        Uri: !Sub "http://${LoadBalancer.DNSName}:8000/{proxy}"
        RequestParameters:
          integration.request.path.proxy: "method.request.path.proxy"
        IntegrationResponses:
          - StatusCode: 200
      MethodResponses:
        - StatusCode: 200

  # API Gateway Deployment
  APIGatewayDeployment:
    Type: "AWS::ApiGateway::Deployment"
    Properties:
      RestApiId: !Ref APIGateway
      StageName: "prod"
    DependsOn: [APIGatewayMethodFrontend, APIGatewayMethodBackend]
Here we create two resources, one for the frontend and one for the backend. We then create methods for each resource that will route the traffic to the internal NLB. The NLB will then route the traffic to the backend services.
You can see these resources and methods in the console like this:

API Gateway in AWS Console
The deployment API can be seen under the stages section of the API Gateway. It would look something like this: https://3al3x2812j.execute-api.us-east-2.amazonaws.com/prod
You can invoke the frontend HTML page with the following URL: https://3al3x2812j.execute-api.us-east-2.amazonaws.com/prod/frontend.
The backend STATUS API can be invoked with the following URL: https://3al3x2812j.execute-api.us-east-2.amazonaws.com/prod/backend/status
Note: We have not updated the frontend HTML page to use the API resource paths. This is something that can be done in the deployment pipeline using GitHub actions in the following sections.
Scaling and Monitoring
We did not setup CPU load based scaling for the ECS tasks. This can be done by setting up a CloudWatch alarm that triggers an ECS service scaling policy. The scaling policy can be configured to scale up or down based on the CPU load of the ECS tasks.
The ECS tasks can be monitored using CloudWatch logs and metrics. The logs can be viewed in the CloudWatch console, and the metrics can be used to set up alarms and dashboards to monitor the performance of the ECS tasks.
Demand based scaling is a feature of the ECS service that can be used to automatically scale the ECS tasks based on the demand from the backend services. The ECS service will monitor the demand and scale up or down the tasks based on the demand. We are not going into the details of this setup for the time being.
To manually add capacity to the infrastructure, you can update the desired count of the ECS service. This will bring up more tasks in the ECS cluster to handle the load. In the template we setup, the infrastructure is limited to scale up to a maximum of 10 instances. This can be increased based on the requirements.
GitHub Actions for CI/CD
Now that the infrastructure is setup, it is desirable to automate the deployment process in the case of a code change in the application. We will use GitHub actions to automate the deployment process.
I am setting up the repository at https://github.com/embeddedinn/aws_production_lb to host the code and setup the actions. I will also commit the infrastructure code to this repository.
Authentication
Follow the instructions for Configuring OpenID Connect in Amazon Web Services to setup the authentication for the GitHub actions.
The openID connect setup can be done with the following in the cloudformation template:
# OpenID Connect for GitHub
AppGithubOpenIDConnect:
  Type: "AWS::IAM::OIDCProvider"
  Properties:
    Url: "https://token.actions.githubusercontent.com"
    ClientIdList:
      - sts.amazonaws.com # since we will be using the official GitHub actions
A role for this can be created with the following entry in the cloudformation template:
  # IAM Role for GitHub
  AppGithubRole:
    Type: "AWS::IAM::Role"
    Properties:
      RoleName: "appGithubRole"
      AssumeRolePolicyDocument:
        Version: "2012-10-17"
        Statement:
          - Effect: "Allow"
            Principal:
              Federated: !GetAtt AppGithubOpenIDConnect.Arn
            Action:
              - "sts:AssumeRoleWithWebIdentity"
            Condition:
              StringEquals:
                # allow only a soecific GitHub account, repo and branch
                token.actions.githubusercontent.com:sub: "repo:embeddedinn/aws_production_lb:ref:refs/heads/main"
                token.actions.githubusercontent.com:aud: "sts.amazonaws.com"
      Policies:
        - PolicyName: "AppGithubPolicy"
          PolicyDocument:
            Version: "2012-10-17"
            Statement:
              - Sid: "ECSPermissions"
                Effect: "Allow"
                Action:
                  - "ecs:UpdateCluster"
                  - "ecs:ListAttributes"
                  - "ecs:StartTask"
                  - "ecs:DescribeTaskSets"
                  - "ecs:UpdateService"
                  - "ecs:CreateService"
                  - "ecs:RunTask"
                  - "ecs:StopTask"
                  - "ecs:DescribeServices"
                  - "ecs:DescribeTasks"
                  - "ecs:UpdateTaskSet"
                  - "ecs:GetTaskProtection"
                  - "ecs:DeleteService"
                  - "ecs:DescribeClusters"
                  - "ecs:ListTagsForResource"
                  - "ecs:ListContainerInstances"
                  - "ecs:RegisterTaskDefinition"
                  - "ecs:DescribeTaskDefinition"
                Resource:
                  - !Sub "arn:aws:ecs:${AWS::Region}:${AWS::AccountId}:cluster/appCluster"
                  - !Sub "arn:aws:ecs:${AWS::Region}:${AWS::AccountId}:task-definition/appTaskDefinition/*"
                  - !Sub "arn:aws:ecs:${AWS::Region}:${AWS::AccountId}:task/appCluster/*"
                  - !Sub "arn:aws:ecs:${AWS::Region}:${AWS::AccountId}:task-set/appCluster/*"
                  - !Sub "arn:aws:ecs:${AWS::Region}:${AWS::AccountId}:service/appCluster/*"
                  - !Sub "arn:aws:ecs:${AWS::Region}:${AWS::AccountId}:container-instance/appCluster/*"

              - Sid: "ECRPermissions"
                Effect: "Allow"
                Action:
                  - "ecr:StartImageScan"
                  - "ecr:DescribeImageReplicationStatus"
                  - "ecr:ListTagsForResource"
                  - "ecr:UploadLayerPart"
                  - "ecr:BatchGetRepositoryScanningConfiguration"
                  - "ecr:ListImages"
                  - "ecr:TagResource"
                  - "ecr:DescribeRepositories"
                  - "ecr:CompleteLayerUpload"
                  - "ecr:BatchCheckLayerAvailability"
                  - "ecr:GetLifecyclePolicy"
                  - "ecr:PutLifecyclePolicy"
                  - "ecr:DescribeImageScanFindings"
                  - "ecr:GetDownloadUrlForLayer"
                  - "ecr:DeleteLifecyclePolicy"
                  - "ecr:PutImage"
                  - "ecr:UntagResource"
                  - "ecr:BatchGetImage"
                  - "ecr:DescribeImages"
                  - "ecr:StartLifecyclePolicyPreview"
                  - "ecr:InitiateLayerUpload"
                Resource:
                  - !Sub "arn:aws:ecr:${AWS::Region}:${AWS::AccountId}:repository/${ECRRepository}"
                  - !Sub "arn:aws:ecr:${AWS::Region}:${AWS::AccountId}:repository/${ECRRepository}:image/*"

              - Sid: "GithubActionsPermissions"
                Effect: "Allow"
                Action:
                  - "ecr:GetAuthorizationToken"
                  - "ecs:DescribeTaskDefinition"
                Resource: "*"

              - Sid: "VisualEditor3"
                Effect: "Allow"
                Action:
                  - "iam:PassRole"
                Resource:
                  - !Sub "arn:aws:iam::${AWS::AccountId}:role/ecsTaskExecutionRole"
                  - !Sub "arn:aws:iam::${AWS::AccountId}:role/ecsServiceRole"
                  - !Sub "arn:aws:iam::${AWS::AccountId}:role/aws-service-role/ecs.amazonaws.com/AWSServiceRoleForECS"
                  - !Sub "arn:aws:iam::${AWS::AccountId}:role/aws-service-role/ecs-tasks.amazonaws.com/AWSServiceRoleForECSTasks"
                  - !Sub "arn:aws:iam::${AWS::AccountId}:role/aws-service-role/ecs.amazonaws.com/AWSServiceRoleForECS"
Now, setup a GitHub action to build and push the docker image to the ECR repository. The following is the GitHub action that can be used:
name: Push-to-ecr-deploy-ecs

on:
#  push:
#    branches: [ "main" ]
#  pull_request:
#    branches: [ "main" ]
  workflow_dispatch:

jobs:
  build:
    runs-on: ubuntu-latest
    permissions:
      id-token: write
      contents: read
    steps:
      - uses: actions/checkout@v2
      - name: Configure AWS credentials
        uses: aws-actions/configure-aws-credentials@v3
        with:
          role-to-assume: arn:aws:iam::338186951935:role/appGithubRole
          aws-region: us-east-2

      - name: Login to Amazon ECR
        id: login-ecr
        uses: aws-actions/amazon-ecr-login@v2

      - name: Download task definition
        run: aws ecs describe-task-definition --task-definition appTaskDefinition --query taskDefinition > task-definition.json

      - name: Build, tag, and push docker image to Amazon ECR
        id: build-image
        env:
          REGISTRY: $
          REPOSITORY: app_repository
          IMAGE_TAG: $
        run: |
          cd src
          docker build -t $REGISTRY/$REPOSITORY:$IMAGE_TAG .
          docker push $REGISTRY/$REPOSITORY:$IMAGE_TAG
          echo "image=$REGISTRY/$REPOSITORY:$IMAGE_TAG" >> $GITHUB_OUTPUT

      - name: Fill in the new image ID in the Amazon ECS task definition
        id: task-def
        uses: aws-actions/amazon-ecs-render-task-definition@v1
        with:
          task-definition: task-definition.json
          container-name: appContainer
          image: $

      - name: Deploy Amazon ECS task definition
        uses: aws-actions/amazon-ecs-deploy-task-definition@v2
        with:
          task-definition: $
          service: appService
          cluster: appCluster
          wait-for-service-stability: true
Now, once we update the app and commit the changes to Github, we can trigger the action to build and deploy the app to the ECS cluster. Existing tasks will be replaced with the new tasks with the updated image. Since we chose a t2.micro instance that might not be able to host two tasks, we set the MinimumHealthyPercent of the service to 50. This will ensure that at least one task is running at all times, and lets the deployment process take down one task at a time to replace it.
Tracking resource outputs
The relevant outputs from the cloudformation stack can be tracked using the following command:
# Outputs
Outputs:
  VPCId:
    Description: "VPC ID"
    Value: !Ref VPC

  PublicSubnetId:
    Description: "Public Subnet ID"
    Value: !Ref PublicSubnet

  PrivateSubnetId:
    Description: "Private Subnet ID"
    Value: !Ref PrivateSubnet

  LoadBalancerDNSName:
    Description: "DNS name of the Load Balancer"
    Value: !GetAtt LoadBalancer.DNSName

  ECRRepositoryURI:
    Description: "URI of the ECR Repository"
    Value: !GetAtt ECRRepository.RepositoryUri

  APIGatewayURL:
    Description: "URL of the API Gateway"
    Value: !Sub "https://${APIGateway}.execute-api.${AWS::Region}.amazonaws.com/prod/"

  AppGithubRoleARN:
    Description: "ARN of the IAM Role for GitHub"
    Value: !GetAtt AppGithubRole.Arn

  TaskDefinition:
    Description: "ARN of the ECS Task Definition Name"
    Value: !Ref ECSTaskDefinition
Conclusion
In this post, we setup a production ready infrastructure in AWS using CloudFormation. We setup a VPC with public and private subnets, an internal NLB, an ECS cluster, an API Gateway, and a GitHub action to automate the deployment process. We also setup the capacity provisioning, load balancer, and target groups to route traffic to the backend services.
The code and templates used in this article can be found in github at embeddedinn/aws_production_lb.


Leave a comment