letsencrypt+namecheap+Apache in DigitalOcean
Introduction
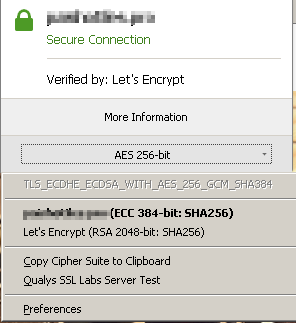
The little green icon 
The basic stuff I need for this are
- A public IP.
- A server to host a service using that public IP.
- A (sub) domain name.
- A trusted CA issued certificate.
Digitalocean solves the problem of a cheap server with a public IP address with their $5/month Linux SSD virtual machines. If you are new to the service, use this link to sign-up and get $10 credit to start off.
Domain setup
I bought an ultra cheap .pro domain name from namecheap.com for $0.88 + $0.11 ICANN fees. This namem will be valid for one year and comes with free whois protection and basic DNS support. To make the deal even more better, I was charged in INR and I did not have to pay a foreign currency markup fee on my credit card. I ended up paying just INR 69 for a .pro domain valid for a year.
Once the domain was purchased, log in to namecheap dashboard and click the  button. In the
  tab, go to name server and select “Custom DNS” and enter the following three nameservers and apply the changes. This will allow us to manage domain name mappings directly from digital ocean portal.
- ns1.digitalocean.com
- ns2.digitalocean.com
- ns3.digitalocean.com
Once nameservers are setup, login to Digitalocean portal and create a new droplet. I choose the $5 ubuntu server hosted in bangalore for all my experiments.
In the portal, go to Networking > Domains and enter the domain name you just purchased. If the domain name is already taken, DO will not allow you to register it again. I assume, they check they local cache for this since the check is quiet fast and I was able to do a cross registration while I was still new and with namecheap basicDNS.
Enter the domain name and click  . Once the domain is added, enter the following two minimum records
Optionally, you can host your own mailinator domain by adding the below MX record:
This will result in 1 A, 1 CNAME and 3 NS records for this domain. Once the DNS controllers sync up, the domain will be accessible for ping.
Now that we have setup a domain name and mapped it to our droplet, we can go ahead and setup a web server in the instance.
Initial server setup
To start with, we need to create a non-root user and install Apache server. Run the following commands for this
apt-get update
apt-get install apache2
adduser webadmin
gpasswd -a webadmin sudo
For now, we are not going to setup key based entry . However, this is preferred.
Once these steps are done, the domain we setup in the previous step can be used to see the ubuntu Apache test page.
Apache virtual host setup
For these steps , we need to log in as the non-root user we created. Use su webadmin for this. We will setup our web server to have multiple virtual hosts. For this, follow these steps:
- Create the document root folder folder with
sudo mkdir -p /var/www/test.com/public_html - Grant permissions with
sudo chown -R $USER:$USER /var/www/test.com/public_html - Ensure read access with
sudo chmod -R 755 /var/www - Create a test page with
vi /var/www/test.com/public_html/index.htmland enter the following contents
<html>
  <head>
      <title>Welcome to Test.com!</title>
  </head>
  <body>
      <h1>Success!  The test.com virtual host is working!</h1>
  </body>
</html>
- Create a Virtualhost configuration template with
sudo cp /etc/apache2/sites-available/000-default.conf /etc/apache2/sites-available/example.com.conf - Enter below contents into the config file:
<VirtualHost *:80>
    ServerAdmin admin@test.com
    ServerName test.com
    ServerAlias www.test.com
    DocumentRoot /var/www/test.com/public_html
    ErrorLog ${APACHE_LOG_DIR}/error.log
    CustomLog ${APACHE_LOG_DIR}/access.log combined
</VirtualHost>
- save the config and enable the virtual host with
sudo a2ensite test.com.conffollowed bysudo service apache2 restart
Now, try navigating to the domain from a browser and the ubuntu test page will be replaced with our new page
setting up a certificate with Letsencrypt
[Letsencrypt]{https://letsencrypt.org/}{:target=”_blank”} provides an automated way to fetch free and valid 2048 bit RSA domain certificates.
The automation tool used in this process is certbot. To install certbot, follow these steps:
- Add the repo with
sudo add-apt-repository ppa:certbot/certbot - Update with
sudo apt-get update - Install certboot with
sudo apt-get install python-certbot-apache
Run the following command to fetch a certificate for the domain we setup with sudo certbot --apache -d example.com -d www.example.com
At a stage you will be asked to choose between redirecting all traffic to HTTPS and allowing HTTP as well as HTTPS . It is preferred to redirect to HTTPS.
Let’s Encrypt’s certificates are only valid for ninety days. To setup auto renewals, execute: sudo crontab -e. You will be asked to select an editor and once the files open, enter the following line to the end of the file.
15 3 * * * /usr/bin/certbot renew --quiet
This will automatically run the renewal step daily and renew the certificate when it is due. The --apache command we used during certificate setup will ensure that apache will reload when the certificate is renewed.
At the end of this process, we get the glorious
Eleptic curve certificates
Letsencrypt signs certificates using RSA. However, it allows the client certificates to include public keys for ECC. Since certbot tool does not provide a mechanism for automatically fetching ECC certificates, we will have to manually generate a CSR and get it signed by letsencrypt.
letsencrypt uses alternate subject names to issue the same certificates for multiple (alternate) domains. However, default openssl configuration does not ask for adding alternate subject names while generating signing requests using openssl req. So, as the first step, we need to set up a temporary configuration to do this. This will allow us to use the same certificate for test.com as well as www.test.com
- copy the default openssl configuration file into the current working directory
cp /etc/ssl/openssl.cnf . - uncomment
req_extensions=v3_reqline in the config file. This will let openssl read the v3_req section while creating requests. - go to
[v3_req]section in to config file and addsubjectAltName = @alt_namesto the existing lines. - next add a new section
[alt_names]with the following contents
 [ alt_names ]
 DNS.1 = test.com
 DNS.2 = www.test.com
Now that the setup is ready to create a CSR for EC* certificates, we need to first create a key pair to place the public key in our CSR. Issue the following command to create a key pair.
openssl ecparam -genkey -name secp384r1 | openssl ec -out ec.key
Now, issue the CSR request command as follows to generate the CSR including the public key we just generated.
openssl req -new -sha256 -key ec.key -nodes -out ec.csr -outform pem -config openssl.cnf
To use this CSR and generate a certificate, issue the following certbot command.
certbot certonly -w /var/www/test.com/ -d test.com -d www.test.com --email "admin@test.com" --csr ./ec.csr --agree-tos
This will create files (0000_cert.pem, 0000_chain.pem, 0001_chain.pem) corresponding to the signed certificate, chain and full chain that certbot generates.
To make Apache use these manually generated certificates,
- identify the
SSLCertificateFileandSSLCertificateKeyFileconfigured in/etc/apache2/sites-available/test.com-le-ssl.conf. - Mostly, this will be a softlink to some files in
/etc/letsencrypt/archive/test.com/fullchain.pem - replace the corresponding files with the newly generated certificates.
To enable strong server side TLS, we follow the recommendations from mozilla and edit the configuration in /etc/letsencrypt/options-ssl-apache.conf to:
 SSLProtocol             all -SSLv2 -SSLv3
 SSLCipherSuite          ECDHE-ECDSA-AES256-GCM-SHA384:ECDHE-RSA-AES256-GCM-SHA384:ECDHE-ECDSA-CHACHA20-POLY1305:ECDHE-RSA-CHACHA20-POLY1305:ECDHE-ECDSA-AES128-GCM-SHA256:ECDHE-RSA-AES128-GCM-SHA256:ECDHE-ECDSA-AES256-SHA384:ECDHE-RSA-AES256-SHA384:ECDHE-ECDSA-AES128-SHA256:ECDHE-RSA-AES128-SHA256
 SSLHonorCipherOrder     on
 SSLCompression          off
Restart apache with sudo service apache2 restart
This configuration can be checked by running an ssltest on the domain using the online service provided by
The renewal crontab we setup will renew the certificate to use a default (RSA) certificate which will break the ECC certificate we setup and fallback to the default RSA certificate.
Multiple certificates in Apache
Now that we have a RSA certificate generated by certbot and an ECC certificate generated with our own CSR, we can setup apache to use both in parallel and serve the corresponding certificate to the client based on suites presented in client hello.
For this, add the following 2 extra pointers to the new (ECC) files along with the default certbot configuration in /etc/apache2/sites-available/test.com-le-ssl.conf
SSLCertificateFile /etc/letsencrypt/live/test.com/fullchain_rsa.pem
SSLCertificateKeyFile /etc/letsencrypt/live/test.com/privkey_rsa.pem
After apache restart, an analysis with the openssl tool shows that both ECDSA and RSA based ciphers are supported by the server now in the order we configured in the server.
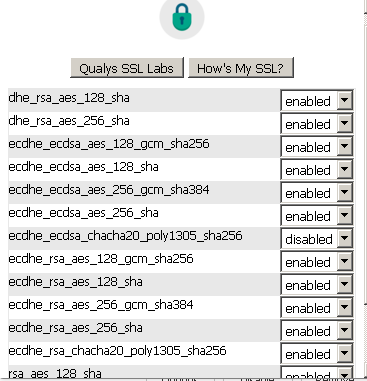
A firefox plugin names toggle-cipher-suites allows us to disable certain ciphers and see corresponding cipher selection in the server we just configured.
SNI considerations for multiple named hosts
By default the initial SSL connection handshake (client hello) will not indicate the host name to which the request is being made. This is a problem when we have different certificates and SSL settings for different virtual hosts behind the same IP address. TLS has an extension named Server Name Indication that allows client hello to include the host name to which the connection request is being made. Apache uses this to select the corresponding server certificate to use in setting up the session.
Most modern browsers supports SNI by default. When using clients like openssl s_client make sure to use the -servername argument to connect to the appropriate virtual host. If this is not provided, connection will be made to the default virtual host.
Client authentication using certificates
If you need to enable client authentication using certificates add the following configuration into the SSL configuration of the corresponding virtual host
#Enable client authentication
SSLVerifyClient require
SSLVerifyDepth 1
SSLCACertificateFile "/etc/letsencrypt/archive/<host>/<expected Root CA>"
SSLOptions +StdEnvVars
Optionally, SSLCACertificatePath can be used to support multiple CAs. StdEnvVars helps with getting the connecting client’s certificate information.


Leave a comment